

- STEPS:
1) Start with the brows. What color you want the brows to be? Blonde? Brunette? Black? Pink? Whatever color, start with a brow powder or eyeshadow of that shade you've chosen and make a general shape of an eyebrow. Notice how I just did a really light sketch of the brow, I dipped my brush in the powder once, and used a light pressure to make the brow shape. Try to avoid being heavy handed with this step as possible. This is just a nice base, and we will get into more of the detail work in the next step :)

2) Now, take either a darker eyeshadow shade, an eyeliner, thin eyebrow pencil or pomade, and draw mini hair-like strokes to mimic actual brow hair. Use as small detailed of a brush as you can to do this step. Think about it- strands of hair are incredibly thin, and we're trying to make this as realistic as possible. Be sure to use a light pressure when pressing your brush onto the skin when doing this step as well.
 .
.

3) Okay, so now that we have the brows all squared away, now time to get to shaping the actual eye. Today, we're starting with a closed eye, I'll make a post soon on how to achieve an opened eye look. 😊 First though, we're going to prime the 'lid' area for the highest color payoff and quality of eyeshadows. Use whatever your heart desires for this- I honestly just use concealer to prime my actual eyelid everyday, so that's just what I used. Use what you trust!
For the eye shaping, I suggest taking an angeled brush with a light brown eyeshadow, brow color, etc. Think of the color of your skin, and how the contours of your face are maybe a shade or two darker than the main part of your skin. Thats's the shade you want this to be, because that's what we're recreating. Be sure to draw the base of the lashline, the crease, and do a tiny bit of shading on the inner and outer contours of the lid if need be. If you need to, google a picture of a closed eye to reference to. It helps alot! Do that with the brows too!


For the eye shaping, I suggest taking an angeled brush with a light brown eyeshadow, brow color, etc. Think of the color of your skin, and how the contours of your face are maybe a shade or two darker than the main part of your skin. Thats's the shade you want this to be, because that's what we're recreating. Be sure to draw the base of the lashline, the crease, and do a tiny bit of shading on the inner and outer contours of the lid if need be. If you need to, google a picture of a closed eye to reference to. It helps alot! Do that with the brows too!


4) Now time for the eyeshadow. And for this, really not much is different. The same rules for eyeshadow on your actual eye apply for your hand. Blend the shadow as much as you can! Apply shadow then blend until you get the desired definition and blend that you want.

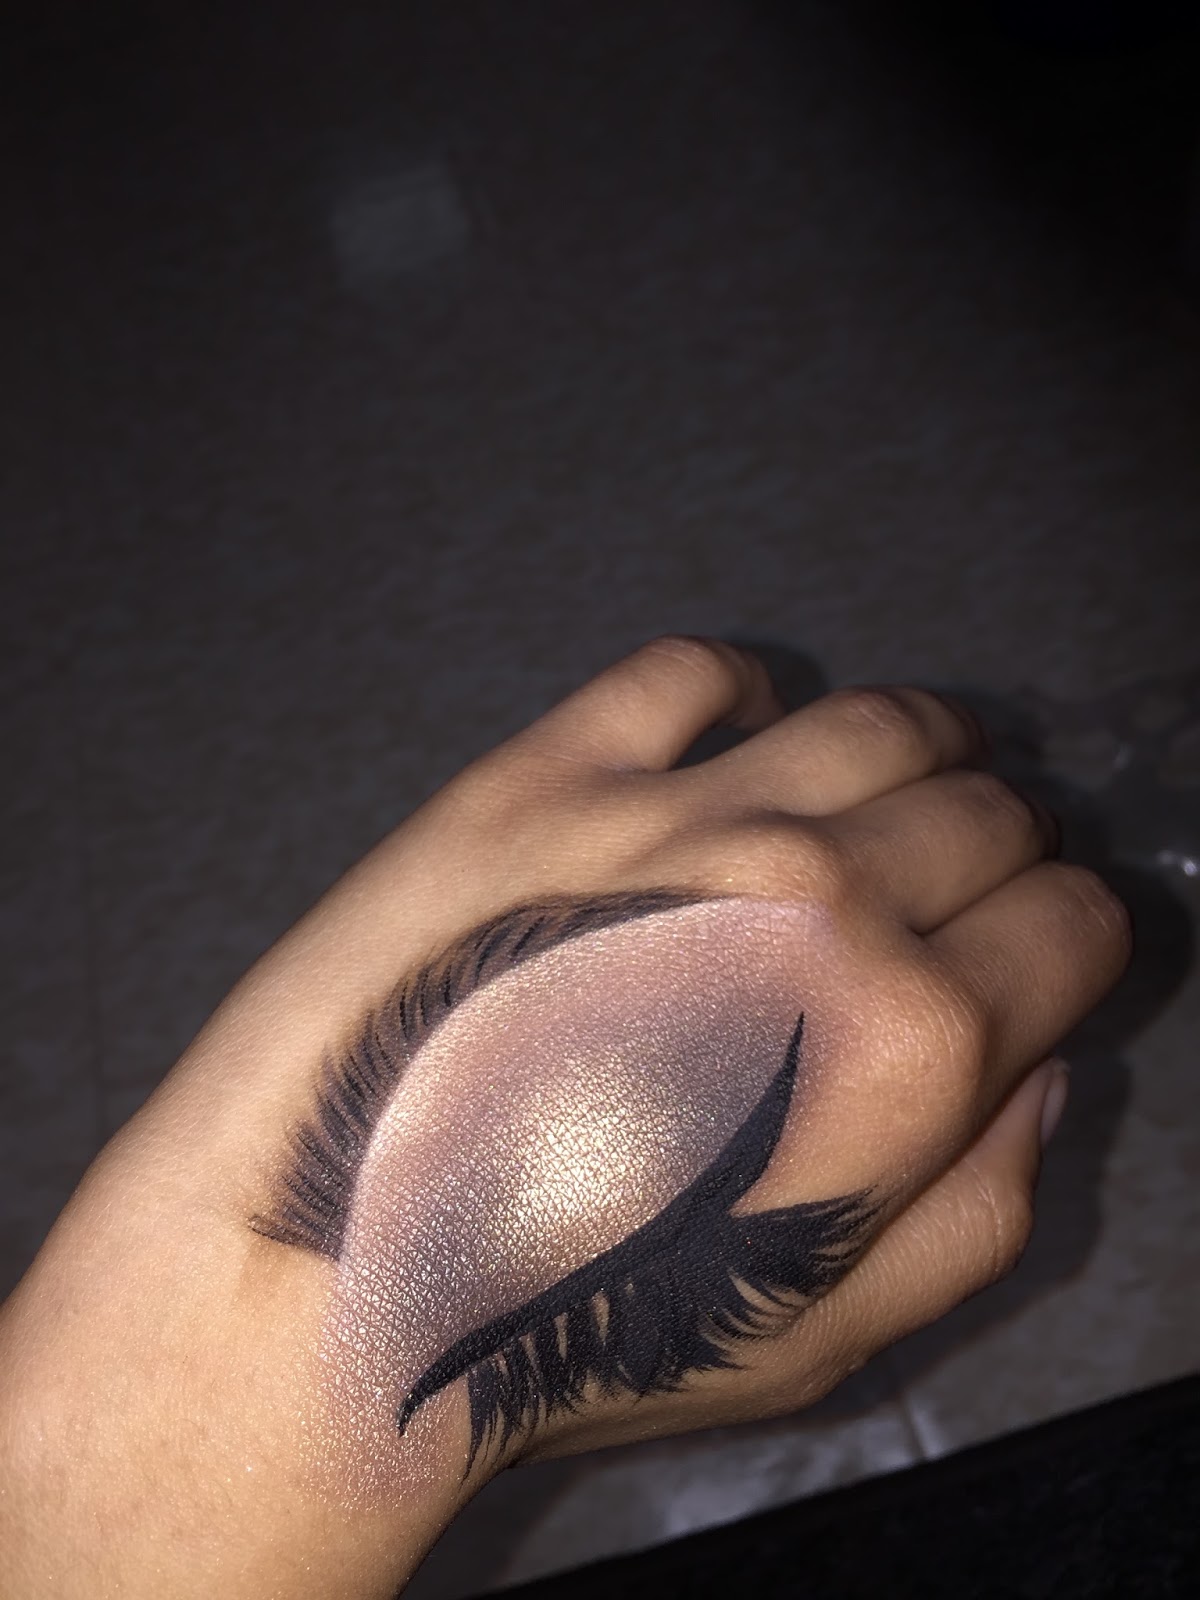
This makeup look was a halo smokey eye that I made using the Morphe 25 B (Bronzed Mocha) palette. I decided not to show the exact eyeshadow steps in this post, because I wanted to focus on the technique of recreating the actual eye. If you want the steps on exactly what I did and what brushes I used, feel free to let me know!

This makeup look was a halo smokey eye that I made using the Morphe 25 B (Bronzed Mocha) palette. I decided not to show the exact eyeshadow steps in this post, because I wanted to focus on the technique of recreating the actual eye. If you want the steps on exactly what I did and what brushes I used, feel free to let me know!
5) Liner and lashes. Just like on your lids, liner and lashes can make or break the look. What I use for the liner and lashes is just eyeliner. Liquid eyeliner gives the most ease and smoothest application in my personal opinion from experience- but any type of eyeliner will do. For the lashes, apply the same technique as for the brow hairs, mimicked lash hair is what we're looking for. Just with the lashes, make the strands a little longer. And a subtle flick a the ends for a curl in the lashes doesn't hurt either :)

SOME HELPFUL TIPS:
-Small detailed brushes are key. These small brushes are the ones I use for the brows, and these eyeliners have the best tipped applicators for precision
-Pay attention to detail. Like mentioned earlier, pictures of actual eyes can help you out tremendously with the contours of the eye and the brows.
-In case I haven't mentioned yet, Did I say it's important yet to blend your shadows?
And that's it!! Such a unique way to apply eyeshadow and something different to change things up. I would love to see if you guys have tried this, so show me your looks!
PRODUCTS USED:
Enjoy, Beauties!
XOXO
PRODUCTS USED:
- Brows: Salon Perfect brow palette & Anastasia Beverly Hills dip brow pomade in ebony
- Concealer: Maybelline Master Conceal in light/medium
- Eyeshadow: Morphe Brushes 25 B palette
- Liner/lashes: Wet N Wild megalast liquid Liner
BRUSHES USED:
- Anastasia Angled #7 Brush
- Eco Tools Angled Brush
- Craft Store detailed brushes
- Elf, Eco Tools, Urban Decay, and Royal & Langnickel eyeshadow brushes for eyeshadow blending
Enjoy, Beauties!
XOXO
No comments:
Post a Comment