Sunday, March 19, 2017

Eyeshadow 101


Hi my beauties! One of the most commonly asked questions I get as a makeup enthusiast is how I apply eyeshadow how I blend eyeshadow, what brushes/ products I use, etc. So today's post I'll be helping you! I'm going to share all of my favorite brushes and eyeshadows to use, how to use them, and to get your eyeshadow game on point. Excuse my ratchet extension clip hanging out in the pictures, I needed to clip my hair out of by face and it was inevitable to hide it lol


STEP 1: EYESHADOW BASE

Some might argue that your eyeshadow base is one of the most important steps in eyeshadow application. I'm one of those people as well. You need to have a strong base to hold everything together. Eyeshadow bases also help blendability, pigmentation and longevity of your eyeshadows. There are plenty of eyeshadow bases that I myself have tried and can honestly recommend to you guys.


  • Urban Decay Primer Potion
  • Wet n Wild Photofocus Eyeshadow Primer
  • Nyx Jumbo Eye Pencils (any color depending on the look you're going for)
  • Concealer

What I use day to day in all honesty is concealer. It gets the job done and is already right there in my makeup bag. Apply the eyeshadow base from lid to browbone, and make sure it's equally blended all across the eyelid area. 

STEP 2: SET THE EYESHADOW BASE

Setting the eyeshadow base is important to do right after application. Your eye area has tons of creases, and applying a liquid product without a powder on top will emphasize creasing, and will make your eyeshadows crease, and it's not the most flattering look. You can use two things to set your shadow base: a skin- tone colored eyeshadow or your face powder. I use either/or, whichever is closest in front of me in all honesty- both work the same for me.

STEP 3: APPLY THE TRANSITION COLOR

 The transition color is what helps your eyeshadows all blend and mesh togehter smoothly. You can have blended eyeshadow, but the colors may not mesh together well. The transition color underneath will help in that. I almost always opt for a very light, neutral toned brown. I use a big fluffy brush and sweep this in my crease, and right below my browbone- so it covers about half of the eye area.

STEP 4: APPLY A CREASE COLOR

These next few steps are very crucial, but can also get a tad repetitive. One of the biggest steps I've learned in my years of doing makeup is to build up color pigmentation little by little. Take your time blending, over blend if you need to! How to build up color payoff and pigmentation is this: So you know that light brown eyeshadow color you just used for the transition shade? Go up 1-2 shades from that, go with a denser but still fluffy blending brush, and apply that in the crease as well, but make sure it stays in the crease a little lower than your transition shade. dip your brush in the eye shadow little by little. It's way easier to build up color pigmentation than it is to blend it away.


Now, after I get the first crease shade in, I'm going to go back with that first fluffy crease brush and transition shade, and with no additional product, I'm going to sweep my brush over where the crease shade and transition shade meet, and just make sure everything is blending accordingly. Be sure to use windshield wiper motions like on your car to blend this crease. If you need to go back into the crease shade after this, feel free! Makeup is all about applying color, blending it, and rebuilding. Go back and forth with this step until you've reached your desired definition and blend of your makeup.


These next couple of steps get more optional- it depends on how dark of a crease you want. Basically, the darker the crease you want, the darker of shades of eyeshadow you want, the smaller detailed of a crease brush you want, and the lower in the crease area you'll apply the colors. So, in this step, I went in with, again, a brown shade 2 shades darker than the previous shade, and with an actual crease brush, I'm going to apply this more so in the crease only, versus the crease and upper crease area like previously done. Just be sure while doing this, you are going back with your previous brush and blend accordingly. You don't necesarily need more color when you're strictly blending, so only get more eyeshadow if you feel you need more. Again, apply, blend, reapply, reblend. 


And in this last crease step, I just go in with a detailed crease brush, an even darker brown, and apply this even more defined in the crease, and I repeated the previous blending steps.


STEP 5: APPLY THE LID COLOR

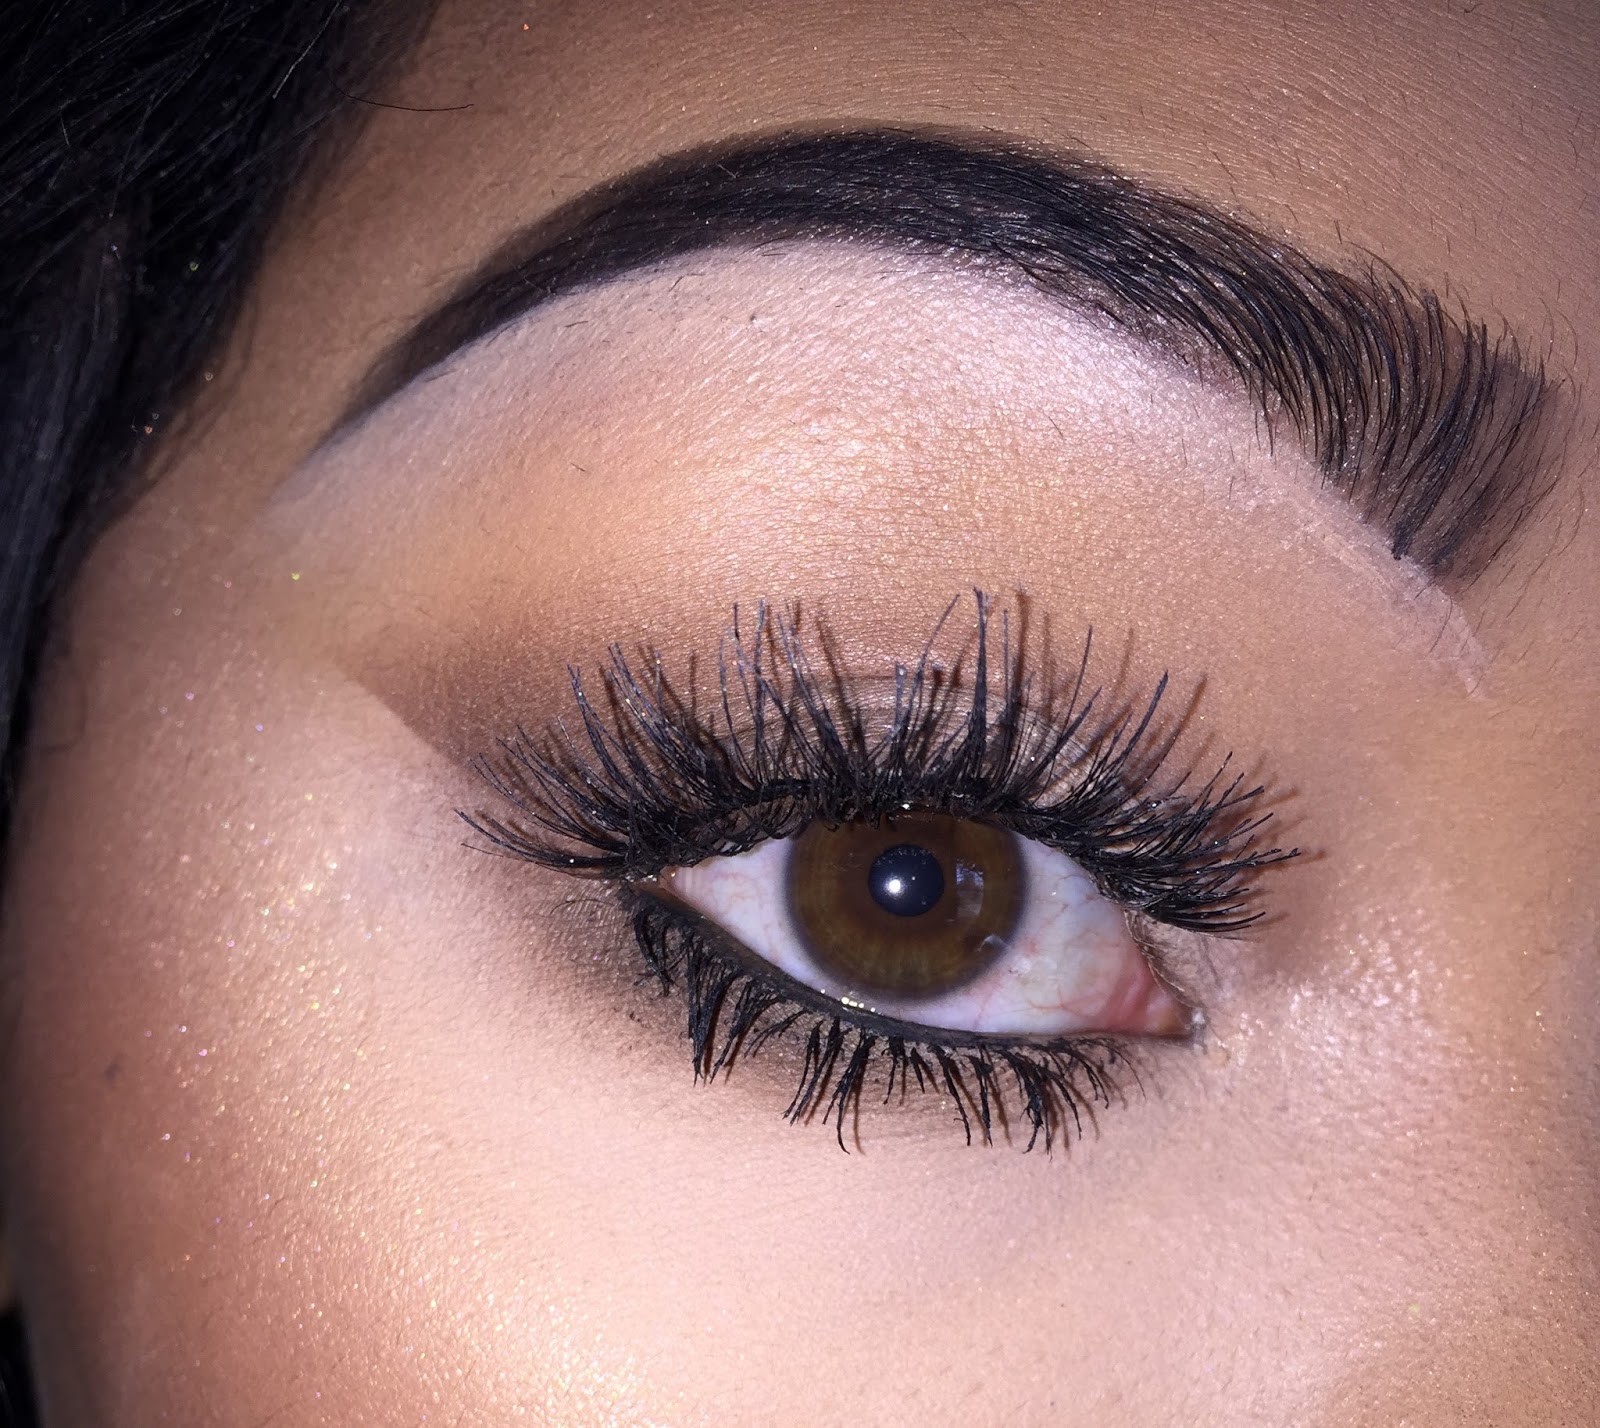
The lid color will go directly below all the crease shades. An optional step you can take to make this lid shade pop is to either reapply your original eyeshadow primer you used earlier, or what I use is the NYX Jumbo Eye Pencil in Milk. It's a white, creamy eyeshadow base that works perfect. Just be careful in not messing up your creasework! You spent too much time blending that to ruin it! Afterwards, I take a flat eyelid brush, and take the color you want on your lid, and just tap it on the lid. Sweeping it across like you did in the crease will make the lid application bumpy and uneven. Today, I stuck with a basic, more neutral eye look, so I just had a cream shade on the lid.


Now your eyeshadow is done! Go ahead and apply whatever eyeliner, mascara, falsies, etc. you want and you'll be on your way!


PRODUCTS USED:

Brushes: Elf cosmetics, EcoTools, Royal & Langnickel 
( All can be found at drugstores)

Eyes: MorpheBrushes eyeshadows

OTHER RECOMMENDED PRODUCTS:

Moda Brushes

Morphe brushes and eyeshadows

Buxom Cosmetics eyeshadows

Wet n Wild Cosmetics eyeshadows

KatVonD eyeshadows

Smashbox Cosmetics eyeshadows

Hope you guys learned a tip or two! Subscribe by entering in your email for more confessions!

XOXO

Tuesday, March 14, 2017

How to: Smokey Cat Eye

CAT EYES

Cat eyes are huge in the makeup world. Basically, if you don't know what it is, it's applying lighter colors in the inner part of your eye, and darker colors on the outer part of your eye. It's such a complimenting look on all eye shapes and sizes, and really is extremely simple to do once you can get the technique down- which isn't that hard either. It opens up your eyes, and helps you looks more awake too! There are no cons to these eye looks. All you need are a few eyeshadow brushes and your favorite eye shadows!

STEPS:


1.) Start with priming your eyelids- you can use actual eyeshdow primer, concealer, or foundation. I've tried all three of these and in all honesty, all three work the same, so just use what's most convenient for you. I personally just use my concealer. 

2.) Take a fluffy blending brush, and an eyeshadow shade that's as close to your skin tone, and apply it all over your eyelid. 

3.) Okay, now we're ready for tape. Take any clear tape you have, and the tip for applying it in the right spot is to go from the end of your eye and to the end of your brow. Lay the tape down in that imaginary line area.

4.) So now, I went with a mid tone caramel- colored brown shade and applied that mainly in the outer edge and blended it in gradually to the middle of my crease. This step, I used a smaller blending brush.


5.) So this is where these steps are going to get a little repetitive, but are insanely important if you want a beautiful cat eye. This time, I went in with an even darker, more chocolate toned brown. I used the same brush BUT I stayed closer to the outer edge. I DID NOT blend as close to the mid crease as I did in the previous step. As you can see, I applied the shadow in kinda a diagonal triangle shape. Then, be sure to blend out accordingly when you get the color placed.


6.) This step is the same as the fifth step, just I am using a darker color, so I will be staying even closer to the outer edge and further away from the middle. We are intending on creating a gradient here. Repeat these steps until your outer corner has the desired darkness you're wanting. Just the main tip is to gradually increase on darker colors. Take your time on blending, and be careful on color placement. REMEMBER- The darker the color, the further to the outer edge you need to keep it. Another blending tip: The DARKER the color, the LESS eyeshadow you actually pick up. Take your time building up color payoff. It's a lot easier to build up color than to blend away too much.

7.) In this step, I'm applying a vanilla based white shade, and applied this all on the inner part of my lid, a little in the middle. I went back with my fluffy blending brush that I used first and meshed together the white with the light brown.


8.) Look at the finished product again. Does anything need fixed or touched up? I needed more of the chocolate brown, so basically what I did was I repeated step 5.


9.) Once you're happy with how your eyeshadow and how it looks, it's time to take off the tape! I still get amazed at how different your eyeshadow looks when the tape is on vs. when you take it off, mainly because of all the fallout the tape picks up.


10.) Now go ahead and go about the rest of your makeup :)

Here's the finished product! With eyeshadow, lashes, and a little liner on!


This technique can be used with different eyeshadow colors as well. You can do a bright green smokey cat eye, and if you follow these steps, it will still look beautiful! Hope you guys enjoyed! More makeup looks coming soon!

PRODUCTS USED:

Eyeshadow: Morphe Brushes 25B Bronzed Mocha Eyeshadow Palette- can be found on their site

Brushes: Elf Cosmetics and Royal & Langnickel- both can be found at walmart and on their site.

XOXO

Sunday, March 12, 2017

Spring/Festival Season Updo

Hey guys 😊 How's everyone doing? Today's post I'm super excited about, because I looooved the
turnout. It's this EXREMELY EASY updo for spring/festival season/summertime, that literally needs one item: a headband- of your choice as well! It just needs to be able to be elastic around your whole head- that's really it though. This updo is also perfect for prom, weddings, or any other special occasions. Are you ready? Let's get started! Hope you guys like it as much as I do!

MATERIALS NEEDED:

  • Headband with an elastic around your head

The one I got was from Walmart for guess how much? 88 cents! Yeah, I got it on sale but I love it! It's so me with the gold.

OPTIONAL:
  • Bobby pins
  • Hairspray 
  • Curling iron - I didn't even curl my hair. You may want some bangs to frame your face to be curled though- totally your preference.
STEPS:
  1. Start with smooth, brushed out hair. It can be curled if you prefer, but you can leave it straight like I did just for time preservation.

    2. Put your headband in your hair- What you need to do with this part though, is not put it under your hair, like you would when wearing a normal headband. You'll put it over all of your hair.


    3. Grab a 1-1 & 1/2 inch section and twist it

4. Now here's the hardest step- which isn't even that hard. What your're going to do with this step is take that small section, and loop it around and tuck it in your headband like shown.


5. Now, if you have longer hair or extensions like I do, you'll have to repeat the last step from step 4 with the excess hair. 


6. Now, all you'll do is repeat these steps all over the rest of your head! You can take larger sections, smaller sections, whatever you desire! 

 Aaaand here you go! The finished product! It looks like a formal curled updo that took 82942 bobby pins! If you have any hairs out of place, you may need hairspray, or a bobby pin or 2 to tame a few stray hairs, but that's really it! It's such a pretty hairstyle that's totally worth trying.


Hope you all enjoyed! Let me know of any other hairstyles you want me to try! 

XOXO

Thursday, March 9, 2017

Spring Makeup Trends

Image result for spring makeup products    Hello everybody! With spring (thankfully) being around the corner, it's such an exciting time for beauty lovers. Why? New makeup trends, new makeup releases, new hair and fashion trends, etc. Of course the warmer and sunnier weather coming around the corner too is a major plus! So with that being said, today I'm going to be helping you guys getting your makeup game ready for spring. I'm going to talk about some trends that are big every spring season, and some recommended products to help you achieve the desired look. Hope you guys enjoy! Don't forget to subscribe!


    TREND 1:

    Glowy Skin

Bright, radiant skin never goes out of style no matter what time of year it is. Just enhancing the glow even more is typically a style that beauty fanatics love to do. Doing this requires the following:
  • exfoliated, hydrated skin
  • dewy foundation
  • highlighter, more highlighter, and did I say highlighter?
    • To start this, be sure to wash and moisturize your face per usual before makeup application. Starting with a clean, fresh base is key for makeup application everyday, regardless of what desired skin finish you're trying to achieve,
    • Following, apply your foundation. The 2 best foundations for dewy skin finishes in my opinion are:
      • L'Oreal Tru Match (for oilier skin types)/ Tru Match Lumi (for normal-dry skin types)
      • Maybelline Fit Me! Dewy & Smooth
    • Highlighter: I think if you know eve the slightest thing about makeup, you know about the rave of highlighters. There are so many good highlighters out there, so I'll give the ones I gravitate the most towards:
      • Laura Geller- Gilded Honey
      • BECCA x Jaclyn Hill- Champagne Pop
      • Makeup Geek x Kathleen Lights- Highlighter Palette (I believe this was limited edition)
      • Wet n' Wild- Precious Petals
      • Maybelline Face Studio Highlight/ Contour Palette in medium
      • Anastasia Beverly Hills- Ultimate Glow Kit

Trend 2: 

Peaches, Corals, Oranges, Reds

    Shades of orange/red are huge for spring and summer, which I loooove because those colors compliment my eye really will. I'll include some orange toned makeup looks. For eyeshadow- the palette I recommend is the Morphe 35O. I use the all matte one, but you can get the all shimmer or the combo of the two. It's all orange based which is perfect. 


LIPS: If you are looking for a good lip option of oranges, I recommend the Smashbox Stay All Day Liquid Lipstick in Out Loud. It's so hydrating, and stays on your lips until you scrub it off. I am IN LOVE with the shade.


TREND 3:

 Pops of Color


Spring is a perfect time to try pops of bright colors. You can include pops of colors in so many different ways: lower lashline, inner corner, lips, and as a highlight shade are the most popular typically. Two good lines of affordable, but high quality eyeshadows that have a large color range are from L'Oreal- their infallible single shadows and NYX single eyeshadows. Both can be found at their websites, some drugstores, and Ulta. Here are some looks I've done that have incorporated these types of color pops:

 Inner corner: NYX Prismatic shadow in glass slipper

 Lip: Too Faced Liquid Lip in Melted Berry
Lower Lashline: MakeupGeek Bitten

Lower lashline shadow:  MakeupGeek Bitten

NYX Prismatic Shadow in Glass Slipper for inner corner, cheekbone and browbone


There ya go, guys! There are more spring trends of course, but I figured giving you guys three popular and relatively easy ones would be our best bet, right? Anyway, I hope you guys have enjoyed! Should I do the same post just with hair? Let me know!

XOXO


Wednesday, March 8, 2017

How to dye your hair PROFESSIONALLY at HOME

    So, I am very stubborn in letting people do my hair or makeup. Nothing against any of you guys, I just really prefer to do both of those myself. With that, though, I don't want to harm my hair when I color it. I've tried many different brands, methods, etc., to dying your hair professionally at home, and I am here to give you guys my favorite products for hair coloring.
    So, some of you may think I am just going to be showing you guys box dye that you can get from the drugstore- but there are many other better hair dyes you can get from hair product supply stores that are a lot more beneficial not just in the health of your hair, but color payoff and longevity.

    CONS TO DRUGSTORE DYE:

  • Gives your hair a dry, straw-like texture and feeling
  • Only stains your hair. It doesn't actually penetrate into your strands- which only lets the color last for about one to two weeks and easily wash out. 
  • Constantly having to touch up your hair with box dye will make the price rack up- sure it's only 8-12 dollars today, but after dying your hair every couple weeks what's that going to add up to?
  • Dying your hair multiple times in a months time does awful damage to your hair. 
WHAT DO YOU NEED?

HAIR DYE

No, you cannot get professional hair dye from the drugstore. Professional hair dye is only sold at beauty or hair supply stores. I get my hair dye and the other needed items for hair coloring from Sally Beauty Supply. The closest one to where I live is about 40 minutes away, so it is an annoying drive, or I can order it online. The dye I use is from the L'Oreal HiColor line. I know- I was surprised when I found out L'Oreal had a professional line of hair products as well. But the reviews on this line are amazing! Blogs, YouTube, Pinterest, everywhere I read about this line, I read nothing but good comments. The best thing too? It's SO affordable! One tube of dye is about 6 dollars. The thickness in my hair is about average, and one tube works perfect for me. Now, my natural hair is only to my collarbones though. When/ if I dye my extensions, then I have to use two tubes. I have had my hair a bright red, a maroon, and now it's a blue black shade, and all those shades I used this line of hair dye. It has a variety of shades for you to choose from, and you can always mix shades. I would when I had the bright red in my hair. This line has yet to disappoint me in total honesty. My hair is never felt feeling dry after, and I was never dissatisfied with the color. And I have very stubborn, dry/ brittle hair that has a hard time grasping color. Enough with the rambling-moral of the story, I really recommend this dye.

PHOTOS OF DIFFERENT HAIR SHADES:


All three of my hair color changes were done with the L'Oreal HiColor line, and I love all three looks I've worn. My hair was naturally a dark brown/ off  black, and it had no problem grabbing the bright red dye, and holding it in my hair for a reasonable amount of time.

WHAT ELSE DO YOU NEED?

Developer

30 Volume Creme DeveloperDeveloper does just what it's called. It develops and activates the hair color. Developer can be purchased at Sally's as well. There are different levels of developer you can purchase, ranging from 10, 20, 30, or 40 volume, The higher the volume, the more lift will be provided in your hair, and the stronger color will be deposited. That being said , I typically go for 30 volume, This is the developer I use, and the price of developer ranges from 1.99- 5.39 currently depending on the size you purchase.


OTHER NECESSITIES:


  • Plastic gloves
  • Plastic cap
  • Plastic bowl
  • Mixing tool for the hairdye


Long Tail Bleach and Tint Brush
OPTIONAL:

  • Tint brush
  • Vaseline
  • Towel


STEPS:

  1. squeeze out the hair dye from the tube into your mixing bowl
  2. measure out 2.5 fl. oz. of developer and pour into the bowl (or eyeball the measurement like me)
  3. Mix the dye. Wanna know a trick? I just use the tail end of the tint brush to do the mixing. Just mix until you can tell the products have both meshed well together.
  4. Put on plastic gloves
  5. Apply hair dye in hair. For this, you can use the tint brush if your little heart desires, or you can just use your hands. Just PLEASE remember gloves- your hands WILL STAIN without them. I honestly get stained hands and nails anyway even with the gloves on. How? I have no idea, but you really need the gloves.
  6. After applied all throughout the hair, throw plastic cap on
  7. Wait for 20-40 minutes, depending on hair thickness, color grasp ability, and length. I personally wait about 30 minutes myself.
  8. Rinse out and condition hair when complete. Then style as desired.
TIPS:
  • Apply Vaseline to the outer edges of your face to prevent facial staining from the dye.
  • Wear an old t-shirt to prevent ruining newer ones with dye, or wrap a towel around the shoulders.
  • Wait until your hair is needing to be washed to dye your hair. When your hair is too clean, it doesn't have enough oils that will grip on to the dye as saturated as you want, and it will rinse out a lot easier. 
  • Apply oil to your hair after styling to prevent dry ends if needed.

So there you have it! My words of wisdom in professionally dying your hair at the comfort of your own home! I hope you'll be able to try this out, and you love the L'Oreal HiColor line as much as I do. Have a good one!

XOXO